| 機種名 | LG G Watch | Samsung Gear Live | Moto 360 (1st Gen) |
LG G Watch R | ZenWatch (WI500Q) |
SmartWatch 3 | LG Watch Urbane | Huawei Watch | Moto 360 (2nd Gen) |
ZenWatch2 (WI501Q/WI502Q) |
LG Watch Urbane 2nd Edition |
TAG Heuer Connected |
Moto 360 Sport | Smart Outdoor Watch WSD-F10 |
|---|---|---|---|---|---|---|---|---|---|---|---|---|---|---|
| 発売日 | 2014年6月25日 | 2014年6月25日 | 2014年9月5日 | 2014年11月12日 | 2014年11月21日 | 2014年11月28日 | 2015年4月27日 | 2015年9月2日 | 2015年9月14日 | 2015年11月13日 | 2015年11月12日 | 2015年11月12日 | 2015年12月18日 | 2016年3月25日 |
| ディスプレイ | 1.65-inch IPS |
1.63-inch Super AMOLED |
1.56-inch IPS |
1.3-inch P-OLED |
1.63-inch Super AMOLED |
1.6-inch TFT |
1.3-inch P-OLED |
1.4-inch AMOLED |
1.56-inch/1.37-inch IPS |
1.63-inch/1.45-inch AMOLED |
1.38-inch P-OLED |
1.5-inch LTPS |
1.37-inch AnyLight Hybrid Display |
1.32-inch カラーTFT+モノクロ |
| 形状 | Square | Square | Round Chin | Round | Square | Square | Round | Round | Round Chin | Square | Round | Round | Round Chin | Round Chin |
| 解像度 | 280x280 | 320x320 | 320x290 | 320x320 | 320x320 | 320x320 | 320x320 | 400x400 | 360x330/360x325 | 320x320/280x280 | 480x480 | 360x360 | 360x325 | 320x300 |
| CPU | Snapdragon 400 1.2GHz |
Snapdragon 400 1.2GHz |
OMAP 3 1.0GHz |
Snapdragon 400 1.2GHz |
Snapdragon 400 1.2GHz |
Snapdragon 400 1.2GHz |
Snapdragon 400 1.2GHz |
Snapdragon 400 1.2GHz |
Snapdragon 400 1.2GHz |
Snapdragon 400 1.2GHz |
Snapdragon 400 1.2GHz |
Atom Z34XX 1.6GHz |
Snapdragon 400 1.2GHz |
? |
| メモリ | 512MB | 512MB | 512MB | 512MB | 512MB | 512MB | 512MB | 512MB | 512MB | 512MB | 768MB | 1GB | 512MB | 512MB |
| ストレージ | 4GB | 4GB | 4GB | 4GB | 4GB | 4GB | 4GB | 4GB | 4GB | 4GB | 4GB | 4GB | 4GB | 4GB |
| Bluetooth | 4.0 | 4.0 | 4.0 | 4.0 | 4.0 | 4.0 | 4.1 | 4.1 | 4.0 | 4.1 | 4.1 | 4.1 | 4.0 | 4.1 |
| Wi-Fi | - | ○ | ○ | ○ | - | ○ | ○ | ○ | ○ | ○ | ○ | ○ | ○ | ○ |
| スピーカー | - | - | - | - | - | - | - | ○ | - | ○ | ○ | ? | - | - |
| GPS | - | - | - | - | - | ○ | - | - | - | - | ○ | ? | ○ | - |
| 心拍数センサー | - | ○ | ○ | ○ | ○ | - | ○ | ○ | ○ | - | ○ | ? | ○ | - |
| 加速度センサー | ○ | ○ | ○ | ○ | ○ | ○ | ○ | ○ | ○ | ○ | ○ | ? | ○ | ○ |
| ジャイロセンサー | ○ | ○ | ○ | ○ | ○ | ○ | ○ | ○ | ○ | ○ | ○ | ? | ○ | ○ |
| 磁気センサー | ○ | ○ | - | ○ | ○ | ○ | ○ | - | - | - | ○ | ? | - | ○ |
| 光センサー | - | - | ○ | - | - | ○ | - | - | ○ | - | - | ? | ○ | - |
| 気圧センサー | - | - | - | ○ | - | - | ○ | ○ | - | - | ○ | ? | ○ | ○ |
| 防水/防塵 | IP67 | IP67 | IP67 | IP67 | IP55 | IP68 | IP67 | IP67 | IP67 | IP67 | IP67 | IP67 | IP67 | 5気圧 |
| その他 | - | - | - | - | - | - | - | - | - | - | LTE/3G | - | - | MIL-STD-810G |
2016年6月24日金曜日
Android Wearな端末一覧
発売日は適当。国によって発売日が異なっていたりして。(それなりに世代順に並べられればなという程度。)
2016年6月22日水曜日
UnityでAmbisonicな録音を試みる
YouTubeさんのSpatial Audio(空間音声)対応を見かけて興味が湧いたところに
360 度動画や VR 動画で空間音声を使用する - YouTube ヘルプ
https://support.google.com/youtube/answer/6395969?hl=ja
こちらのブログ記事と出会ったのでUnityで試してみたメモ。
niu log: 4chサラウンドをAmbisonicsに変換する
http://niulog.blogspot.jp/2016/05/4chambisonics.html
Unity 5.3.5
OS X Yosemite(10.10.5)
Soundflower 2.0b2
4chサラウンドをAmbisonicに変換するということなので
Unityのオーディオ設定でサラウンドを使用するのですが(DefaultはStereo)
こちらの設定はPCのオーディオデバイスがStereo(2ch)出力だと
サラウンド設定が有効にならないようなので(Stereo(2ch)として出力される)
Soundflower(仮想オーディオデバイス)を使用しました。
※Soundflowerの導入方法はここでは割愛しますので、Web検索等で調べてください
Soundflowerがインストールされた状態でMacの[Audio MIDI 設定]を開き
サウンド出力装置をSoundflower(64ch)に変更します。
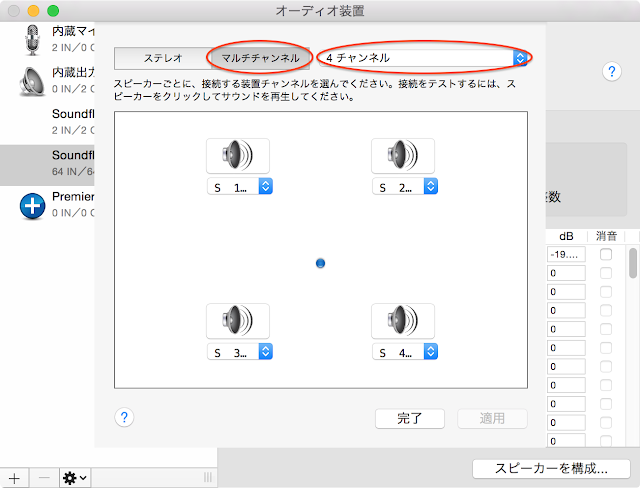
[出力]の[スピーカーを構成...]を開き
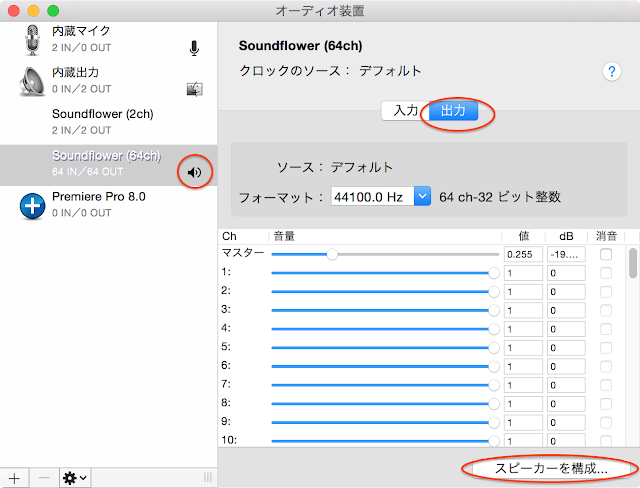
[マルチチャンネル]の[4チャンネル]に設定します。
Unityを起動し、AudioManager([Edit] -> [Project Settings] -> [Audio])の
[Default Speaker Mode]を[Quad]に設定します。
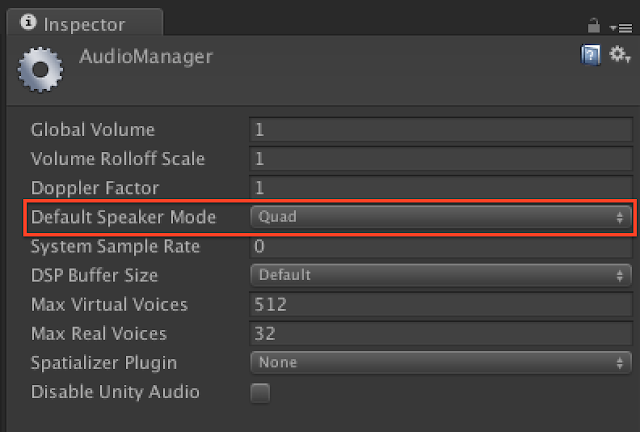
Quadは前左右、後左右の4chです。
Unity - スクリプトリファレンス: AudioSpeakerMode.Quad http://docs.unity3d.com/ja/current/ScriptReference/AudioSpeakerMode.Quad.html
※Unityは起動時にオーディオデバイスをチェックしているようなので
Soundflowerの設定前に既にUnityを起動していた場合は再起動してください。
wxyzチャネルの並び順は上記YouTubeさんのヘルプに
wyzx云々と書いてあったので(よく意味は分かっていない...)
その並びでWAVEファイルを作っています。
Unityのシーン内のオーディオをWAVEファイルに録音する方法は下記を
Writing AudioListener.GetOutputData to wav - problem | Unity Community
http://forum.unity3d.com/threads/writing-audiolistener-getoutputdata-to-wav-problem.119295/
また、WAVEファイルのヘッダ構造はこちらのサイトを参考にさせていただきました。
WAVEファイルの構造
http://www.graffiti.jp/pc/p030506a.htm
AmbisonicRecorder.csをAudioListenerコンポーネントがアタッチされているGameObjectにアタッチします。
Unity EditorのPlay Mode開始〜終了まで録音します。
4ch前提で作っていますのでStart()内のDebug.Log()で
”Quad”とConsoleに表示されることを確認します。
プレビューにはJump Inspectorを使用しました。
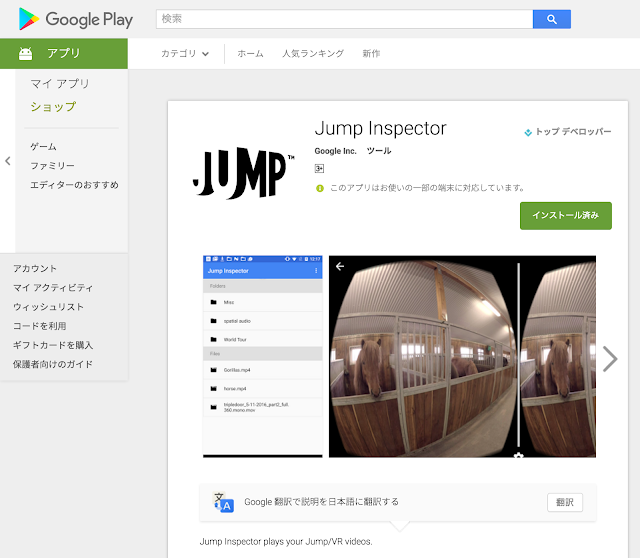
Jump InspectorはGoogleさんがPlay Storeのベータプログラムで公開している
360度動画ビューアーアプリでSpatial Audioにも対応しています。
因みにSpatial Audioなオーディオファイルのみでもプレビュー可能。
対応端末が
・Samsung Galaxy S6
・Nexus 6P
なのが。。(その他の端末で動かないのかは試してません)
Jump Inspector Overview - Jump Help https://support.google.com/jump/answer/6400241?hl=en
※Play Storeのベータプログラムとして公開されているのでベータ登録が必要です。
作成したVR動画をYouTubeにアップしました。
音源が付いた車が自分の周りをぐるぐる回ります。
※デモが微妙でゴメンナサイ。。
因みに、この記事を書いている時点でYouTubeの空間音声が体験できるのは
バージョン 4.2 以降の Android 端末で YouTube Android アプリを利用している
場合のみとなっています。
ヘッドフォン・イヤフォンを付けて視聴してみてください。
どうですかね、音の聞こえ方。
360 度動画や VR 動画で空間音声を使用する - YouTube ヘルプ
https://support.google.com/youtube/answer/6395969?hl=ja
こちらのブログ記事と出会ったのでUnityで試してみたメモ。
niu log: 4chサラウンドをAmbisonicsに変換する
http://niulog.blogspot.jp/2016/05/4chambisonics.html
環境
Unity 5.3.5
OS X Yosemite(10.10.5)
Soundflower 2.0b2
準備
4chサラウンドをAmbisonicに変換するということなので
Unityのオーディオ設定でサラウンドを使用するのですが(DefaultはStereo)
こちらの設定はPCのオーディオデバイスがStereo(2ch)出力だと
サラウンド設定が有効にならないようなので(Stereo(2ch)として出力される)
Soundflower(仮想オーディオデバイス)を使用しました。
※Soundflowerの導入方法はここでは割愛しますので、Web検索等で調べてください
Soundflowerがインストールされた状態でMacの[Audio MIDI 設定]を開き
サウンド出力装置をSoundflower(64ch)に変更します。
[出力]の[スピーカーを構成...]を開き

[マルチチャンネル]の[4チャンネル]に設定します。

Unityを起動し、AudioManager([Edit] -> [Project Settings] -> [Audio])の
[Default Speaker Mode]を[Quad]に設定します。

Quadは前左右、後左右の4chです。
Unity - スクリプトリファレンス: AudioSpeakerMode.Quad http://docs.unity3d.com/ja/current/ScriptReference/AudioSpeakerMode.Quad.html
※Unityは起動時にオーディオデバイスをチェックしているようなので
Soundflowerの設定前に既にUnityを起動していた場合は再起動してください。
コード
wxyzチャネルの並び順は上記YouTubeさんのヘルプに
wyzx云々と書いてあったので(よく意味は分かっていない...)
その並びでWAVEファイルを作っています。
Unityのシーン内のオーディオをWAVEファイルに録音する方法は下記を
Writing AudioListener.GetOutputData to wav - problem | Unity Community
http://forum.unity3d.com/threads/writing-audiolistener-getoutputdata-to-wav-problem.119295/
また、WAVEファイルのヘッダ構造はこちらのサイトを参考にさせていただきました。
WAVEファイルの構造
http://www.graffiti.jp/pc/p030506a.htm
using UnityEngine;
using System;
using System.Collections;
using System.IO;

public class AmbisonicRecorder : MonoBehaviour
{
 private int outputRate = 44100;
 private string fileName = "output.wav";
 private int headerSize = 44;
 //default for uncompressed wav
 private int ambisonicChannels = 4;
 private bool recOutput;
 private FileStream fileStream;

 // Use this for initialization
 void Start ()
 {
  Debug.Log (AudioSettings.driverCapabilities);

  StartWriting (fileName);
  recOutput = true;
 }

 // Update is called once per frame
 void Update ()
 {
 }

 void OnDestroy ()
 {
  recOutput = false;
  WriteHeader ();
 }

 void OnAudioFilterRead (float[] data, int channels)
 {
  // Debug.Log("data.Length:" + data.Length + "/channels:" + channels);
  if (recOutput) {
   short[] shortData = new short[data.Length];
   //converting in 2 steps : float[] to short[], //then short[] to Byte[]

   byte[] bytesData = new Byte[data.Length * 2];
   //bytesData array is twice the size of
   //dataSource array because a float converted in short is 2 bytes.

   int rescaleFactor = 32767; //to convert float to short

   //Ambisonic
   int index = 0;
   for (int i = 0; i < data.Length; i += channels) {
    float frontL = data [i];
    float frontR = data [i + 1];
    float backL = data [i + 2];
    float backR = data [i + 3];

    float front = (frontL + frontR) / 2.0f;
    float back = (backL + backR) / 2.0f;
    float left = (frontL + backL) / 2.0f;
    float right = (frontR + backR) / 2.0f;

    float w = (frontL + frontR + backL + backR) / 4.0f;
    float x = front - back;
    float y = left - right;
    float z = 0.0f;

    // Debug.Log ("w:" + w + "/x:" + x + "/y:" + y + "/z:" + z);
    for (int j = 0; j < ambisonicChannels; j++) {
     float writeData = 0.0f;
     switch (j) {
     case 0:
      writeData = w;
      break;
     case 1:
      writeData = y;
      break;
     case 2:
      writeData = z;
      break;
     case 3:
      writeData = x;
      break;
     }
     byte[] bytes = new Byte[2];
     shortData [index] = (short)(writeData * rescaleFactor);
     bytes = BitConverter.GetBytes (shortData [index]);
     bytes.CopyTo (bytesData, index * 2);
     index++;
    }
   }

   if (!recOutput) {
    return;
   }
   fileStream.Write (bytesData, 0, bytesData.Length);
  }
 }

 private void StartWriting (string name)
 {
  fileStream = new FileStream (name, FileMode.Create);
  byte emptyByte = new byte ();

  for (int i = 0; i < headerSize; i++) { //preparing the header
   fileStream.WriteByte (emptyByte);
  }
 }

 private void WriteHeader ()
 {

  fileStream.Seek (0, SeekOrigin.Begin);

  byte[] riff = System.Text.Encoding.UTF8.GetBytes ("RIFF");
  fileStream.Write (riff, 0, 4);

  byte[] chunkSize = BitConverter.GetBytes (fileStream.Length - 8);
  fileStream.Write (chunkSize, 0, 4);

  byte[] wave = System.Text.Encoding.UTF8.GetBytes ("WAVE");
  fileStream.Write (wave, 0, 4);

  byte[] fmt = System.Text.Encoding.UTF8.GetBytes ("fmt ");
  fileStream.Write (fmt, 0, 4);

  byte[] subChunk1 = BitConverter.GetBytes (16);
  fileStream.Write (subChunk1, 0, 4);

  byte[] audioFormat = BitConverter.GetBytes (1); //Uncompressed PCM
  fileStream.Write (audioFormat, 0, 2);

  byte[] numChannels = BitConverter.GetBytes (ambisonicChannels);
  fileStream.Write (numChannels, 0, 2);

  byte[] sampleRate = BitConverter.GetBytes (outputRate);
  fileStream.Write (sampleRate, 0, 4);

  byte[] byteRate = BitConverter.GetBytes (outputRate * 2 * ambisonicChannels);
  // sampleRate * bytesPerSample*number of channels, here 44100 * 2 * 4
  fileStream.Write (byteRate, 0, 4);

  byte[] blockAlign = BitConverter.GetBytes (8);
  // 16bit * number of channels, here 16bit * 4 = 64bit = 8byte
  fileStream.Write (blockAlign, 0, 2);

  byte[] bitsPerSample = BitConverter.GetBytes (16);
  fileStream.Write (bitsPerSample, 0, 2);

  byte[] dataString = System.Text.Encoding.UTF8.GetBytes ("data");
  fileStream.Write (dataString, 0, 4);

  byte[] subChunk2 = BitConverter.GetBytes (fileStream.Length - headerSize);
  fileStream.Write (subChunk2, 0, 4);

  fileStream.Close ();
 }
}
使い方
AmbisonicRecorder.csをAudioListenerコンポーネントがアタッチされているGameObjectにアタッチします。
Unity EditorのPlay Mode開始〜終了まで録音します。
4ch前提で作っていますのでStart()内のDebug.Log()で
”Quad”とConsoleに表示されることを確認します。
作成されたWAVEファイルはプロジェクトディレクトリ直下に
output.wavというファイル名で出力されます。
プレビュー
プレビューにはJump Inspectorを使用しました。

Jump InspectorはGoogleさんがPlay Storeのベータプログラムで公開している
360度動画ビューアーアプリでSpatial Audioにも対応しています。
因みにSpatial Audioなオーディオファイルのみでもプレビュー可能。
対応端末が
・Samsung Galaxy S6
・Nexus 6P
なのが。。(その他の端末で動かないのかは試してません)
Jump Inspector Overview - Jump Help https://support.google.com/jump/answer/6400241?hl=en
※Play Storeのベータプログラムとして公開されているのでベータ登録が必要です。
デモ
作成したVR動画をYouTubeにアップしました。
音源が付いた車が自分の周りをぐるぐる回ります。
※デモが微妙でゴメンナサイ。。
因みに、この記事を書いている時点でYouTubeの空間音声が体験できるのは
バージョン 4.2 以降の Android 端末で YouTube Android アプリを利用している
場合のみとなっています。
ヘッドフォン・イヤフォンを付けて視聴してみてください。
どうですかね、音の聞こえ方。
登録:
投稿 (Atom)